The No Till No Dig Way: Revisiting The Lasagna Garden Mound
-
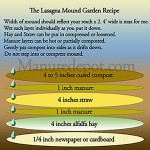
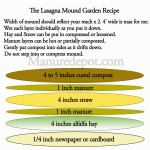
- Lasagna Mound Garden Recipe
-
- Printer Version
The quickest way to get your garden growing in a hurry and without any previous plan is to build a lasagna garden or mound.
I have written the recipe for this in the article The No Dig Garden Box, and I thought since I find myself talking about this garden so frequently and my old article is so far into the past I would repost the recipe for you, and this time in picture form.
The concept of this no dig bed is simple. You don’t till or disturb the soil below, and you create a mound that roughly approximates a balanced pile of stable scrapings. This is a great way to start quickly and these mounds feed the soil below as the growing season progresses attracting beneficial insects and microbes to your growing area, and you won’t have to fertilize the plants growing in these mounds.
Since you don’t ever want to step into your garden mounds make sure that when you plan the bed size you will be able to reach at least halfway across the bed from the edge where you will be working, and that you can get to both sides to work.
My mounds are no more than 4′ wide, and are usually 8′ long so that I don’t have to go far to get to the other side. If I am putting a mound or box up against a fence I make it appropriately narrow because I won’t be able to work that bed from the fence side. I have found that I much prefer growing in mounds over boxes. I like the gently sloping mound sides as a growing place for the plants I thin. This is especially useful for lettuce plants which always need thinning, and seem to like the mound’s sides very much.
The newspaper or cardboard bottom layer is for keeping weeds or grass from coming up through the mound. It will break down quickly along with the other components of the mound, but not before smothering out any grass that is on your planting site.
Remember that there is a difference between straw and hay. Where I say straw I mean straw, where I say hay I mean hay, and although you will pay more for alfalfa hay than for coastal hay it is super high in nitrogen and well worth the cost. You can substitute peanut hay for alfalfa hay if you can find that for less, but it is far less common than alfalfa.
Each layer should be wetted as it is put down to assure that the whole pile is uniformly moist.
The best topping for this mound is homemade compost. The second best is bagged composted cow manure. It is a slower start than compost because it has much less life to it, and so must attract and foster the life that is already in your homemade compost, but it will work, and does for many of my clients who are starting gardening and composting simultaneously.
When pouring or shoveling on the top compost layer some of the compost will fall or slip down the sides. This is desirable, just gently pat the compost onto the sides so that it stays, and pull any that spilled beyond the mound back up into the sides and pat again.
The manure layers can be hot, old, or partially decomposed manure. If I have a choice I put the hottest manure in the lowest position, but I have used hot manure in the top manure layer without trouble in the past.
It is a good idea to mulch the plants growing in this bed using straw or shredded leaves. Mulching will keep the weeds down, and will keep the soil from bouncing up onto plant leaves when it rains. Mulching is also a good idea because it is the continuous addition of organic matter to your soil. Soil should be fed in this way to keep it full of beneficial life and to avoid any need for turning in organic materials or tilling. The only plants I hesitate to mulch are the baby tender leaf greens like lettuce. With those I will pull the mulch back a bit from the plants until they are grown up a bit.
You will find that as the growing season progresses the mound will shrink down until by the season end it is just a few inches higher than ground level. When it is time to finish your growing season simply cut your crops down leaving old stems leaves and roots in and on the ground to continue feeding the soil. If you plan to leave the mound fallow for the summer cover it over with 12 to 18 inches of organic materials like leaves, uncured compost, or stable scrapings and cover that over with straw. Then the next season you can just plant right into that straw.
This lasagna recipe is well known among gardeners. Its balanced parts make growing quickly in a brand new garden an easy feat, but it is not the only way to make a mound in which to grow. It is possible to grow in mounds of old composted manure, or partially composted piles of manure and leaves, or leaves and hay and manure, or mounds of composted wood and leaf remains like what’s at the bottom of a passive compost pile. The mounding simply gets it high and draining well, and it assures that the growing area is deep enough for your crops without having to dig in and disturb the soil below.
Get cooking on your No Dig Lasagna Mound and grow something great to eat.
Happy Growing

12 Responses
Thank you for revisiting and expanding on this. Now when I gush about the recipe and send people to your site for it, they’ll find it right away.
Thanks for your comment Pat. At least until my next few blogs this article will be easy to find.
I love the idea of the lasagna mound–makes me hungry for fresh veggies!
yummy.
Thanks Sara and Danny, Y’all seem to be on the same wave length. 😀
Thanks for this Adina. I am looking forward to taking your class at heathcote on this next week but will probably start this week and see if I did it right at the class. FYI: I could not find this recipe from the tags so I did a google a site search and found it straight away. I love your site so not finding the recipe right away has not been a problem because of the discoveries along the way. Thanks!
Thanks for your comment Josh. i am glad you found the article. Good luck with your mound, and see you next week at the Layer Mound class at Heathcote.
this is my first mound garden….I will keep you posted.
Right on Denise. I look forward to hearing how it goes.
Hi,
A year ago I dug out a huge amount of sod from my front yard to make a new flower bed. It made a giant pile of dirt. I saw your post along with many others and decided to recycle the sod. I transferred it to the other side of my front yard and laid it grass side down in layers with no newspaper in between. I wet it well and covered it with black plastic weighted down with bricks. That was last September. I left it covered till Feb. I uncovered it and the soil was awesome. So many earthworms and soft good nitrogen rich soil. It made a mound about 29′ long and 5′ wide. I transplanted some of my Japanese Maples to this area along with two crepe Myrtles and many other plants. This is the healthiest fastest growing area I have! I just recently dug up more sod(I hate lawn) to make a stone pathway. It’s about to be covered for the Winter too. Next Spring I’m planting a specimen succulent garden there. Thanks for your excellent article. Sandra
[…] were left quite soggy. Here is a link to Adina’s blog to find a printable version of the layer mound recipe handout. Check out the next link to see a listing of articles written about this method for more […]
Thanks for your comment Sandra, Way to recycle your sod! Next time, if I may suggest, try this without plastic but mulch it instead with wood mulch or straw or leaves. Plastic ups your carbon footprint on this project. Keep up the good work.