Working Worms
-
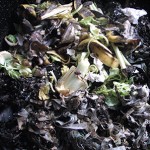
- "In the Bin"
-
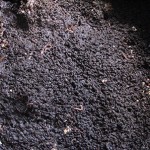
- "Castes In Bin"
-
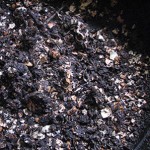
- "Castes and Egg Shells"
-

- "Can O Worms worm bin"
I was at an EcoGrowers of East Central Florida pot luck dinner the other nite. Our host Christine was showing her new worm bin projects. She has two of the cutest worm bins. I got very excited. I knew I had found the right group. I keep worms and haven’t met many others people who do as well. We were discussing the order of the trays, and I promised I would post a blog about my bin, and the way that I feed the worms for others who might be interested.
The worm bin I have is called the Can-O-Worms. It was made in Australia of 100% recycled plastic.
I was attending a wedding in Colorado in ’91 when I saw the Can O Worms bin in a garden store. I was very impressed and took a brochure. Five years later I dug up the brochure and ordered my Can O Worms composter.
This bin, like the ones Christine has is a stacking affair with 3 working trays and a reservoir at the bottom with a spigot for draining off the fluids more commonly known as Worm Tea.
Worm Tea is a fabulous manure tea supplement for plants and it is a byproduct of worm composting. It not only feeds plants, it also contains microbes that will help fight aphids, scale, and mealy bugs when sprayed on infected leaves.
It is important that if you are fashioning your own worm composting bin you create a way to drain off the fluids that will collect in the bottom. Vegetable wastes are about 80% water. That water has to go somewhere. I leave my spigot open all of the time and keep an eye on the jug beneath it. I empty it every few days to make sure it doesn’t over fill. I also pour water into my bin at least once a week. The reservoir section has a hump that reaches up to the next tray so that the worms that go down for a swim can climb up and out of the water and back into the bedding trays.
When you get your bin it will likely come with a block of coconut coir which is the compressed fiber from the outside of coconuts. Get at least 1000 compost worms. Earthworms will not do. The worms I bought are called Red Wigglers. There are several worm farmers in the U.S. My worms were shipped to me from Arizona. It was summertime when I ordered them. The postman put the box of worms in my mailbox where it sat all day. When I found it there it was a smelly mostly cooked affair. The worm farmer sent another box at his expense, and the postman delivered that box to the door. The worm farmer was a prince! He stood behind his worms even though he understood that they sat in my mailbox all afternoon.
Soak the coconut coir in water. It will take about 15 minutes to soak up enough water. Break it up onto a piece of cardboard in the first tray above the water reservoir. The worms go in on top of the wet coir. The cardboard will help keep the coir from falling through the tray’s holes into the reservoir. Leave the other two trays off, and leave the lid off until the worms dive into the coir. They don’t like the light and leaving the lid off for a bit will encourage them to go down. Once they have gone down into the coir cover that layer with some wet newspaper shreds. The newspaper shreds will help keep the tray dark and moist, and the worms will eventually eat the newspaper. The worms will begin to eat the coconut fiber. If the bedding comes up high enough to touch the bottom of the next tray then put the next tray on and put some of your kitchen wastes in cover it up with some wet newspaper shreds and close the lid.
Worms eat about half their body weight each day and can double their population every few months.
After a year of so you will be able to feed off your kitchen wastes quickly, but to begin with be careful not to overfeed the bin. Feed the worms just ahead of what they are consuming.
I used to push aside the shredded newspaper topping to feed the worms and then recover the food with the same newspaper shreds. Now I make layers of food and newspapers. Once I have covered the last layer of newspaper with food again I add another layer of newspapers. It has been many years and my worms are large and the bin is well populated. Wastes go quickly. In a few years you could have 15.000 to 20,000 worms in your bin from your initial 1,000.
Compost worms will also help break down manure. My worms love my rabbit manure. They break down 2 cups in a few days. It is important to avoid manure from livestock that was recently wormed. Vermicide in manure will kill your compost worms too.
The order for the trays is to start at the bottom and work up. Once the 1st tray is full so that the wastes touch the bottom of the next tray begin filling the next tray. By the time the top tray is filled to the line the bottom tray should be broken down. Lift that tray out, dropping the middle tray to the bottom and the top tray to the middle. Put the broken down tray on the top, stir it a little to help aerate it, and leave the top off to encourage the worms to dive down into the lower trays. It will take several days of light exposure and a stirring once each day before the tray will empty of its worms. Once they’re gone you can harvest the casts. I always leave about a cup of castes behind in the tray to help encourage the worms to repopulate it. Add some kitchen wastes, wet newspaper, and cover it up again. It will be several months before you will have a tray of castes. You will be able to get worm tea much sooner than that. Once a week you should pour about 2 liters of fresh water on your worm bin. Make sure the spigot is open and you have a decent sized catch bottle beneath it. I leave the spigot on my bin open all the time.
There are just a few tips I want to give about this worm bin. When changing the order of the trays flip the top over and use it as a tray holder, then you will need just one more surface on which to place a tray while rearranging. Use opaque bottles in which to save worm tea. Don’t feed your worms citrus or onions. They will sour the bin. Don’t freak out when other types of creatures wind up in your bin. My bin houses some spiders and some other squiggly things. It’s compost after all. The bin should smell pleasant like soil. If it gets stinky or acidic you may need to add some garden lime, or slow down on the feeding, or pour in some water, or all of those. Your worms do best in temperatures from 50 to 90 degrees f. If you are going to put them outside they need to be in shade, and protected from rain and freezing. Egg shells are great for the worm bin although the worms don’t make them disappear. Crush the eggshells real well before adding them to the bin they will leak their calcium into the castes, but they will still be visible in the castes you use. If you are leaving for vacation feed the worms a good bit and add some fresh wet newspaper shreds, and leave the spigot open. They will be fine while you are gone. While your bin is establishing itself and you are generating more kitchen wastes than it can use freeze bags of kitchen wastes. When you need them thaw them out and put them in the bin. Food that has been frozen breaks down much more quickly, and will cover well when you have to leave for a few weeks.
Worm castings are a fabulous manure additive for your garden, potted plants, or your compost pile. I use mine as quickly as they are harvested in order to get the benefit of their microbial life. I use the castes with eggshells on tomato plants first although all worm castings have calcium in them from the worms’ digestive process. Fresh castings are sticky and so a little difficult to handle. I top or side dress my plants with them, just spooning them out around the drip line of the plant.
To buy some of my fresh worm castings click here.
Here is a link for Our Vital Earth where you can find distributors in several Florida towns for the Can O Worms worm bin. http://www.ourvitalearth.com/wonderworm-distributors.htm

28 Responses
Thanks, Adina, for taking time to give us the rundown of vermicomposting. I love my little wigglers and the service they provide me (and the earth ; ) Now I will know what to do when they are ready to move on up to the next level of their deluxe apartment in the sky!
Thanks for your comment Christine. Best of luck with your wigglers.
This is an excellent post. I understand it very well. It is such a cool vibe. I think more people should take heed as our food supply gets weaker and costs more, not to mention how healthy it is to grow your own!
This post is really informative. Everybody should have red worms to save on landfill that we are running out of and creating hazards. Worms help the enviroment, They dont bite or smell.
FEED YOUR WORMS AND SAVE THE LANDFILL
Thanks for your comment Howard. Right on they don’t bite or smell.
Thanks for your comment Danny. Be sure to wash those worms before eating them! hehe
Do worms sleep?
I had no idea you could do a worm bin with trays! We have a VERY simple set-up in the backyard, so simple in fact that I’m wondering how to collect the castings. It’s a box with the worms living in about 2 feet of dirt, with decomposing leaves and plant material on the top to keep them cool. We mix the kitchen scraps in under the leaves, and replace the plant material every week or two, as needed. It’s a great system to get rid of kitchen scraps but now I’m wondering how to separate the castings from the dirt. Any suggestions? Thanks!
Hi Lara, Thanks for your comment. This is the number one problem with simple home made vermicomposters. They do all the right stuff, but when it is time to harvest it is pretty tough to separate the worms from the castings. So here is what I suggest: You are going to have to fashion a tray that will sit above or on top of the composter you made, and it will need to have a perforated bottom through which the worms can drop while still holding the castings. I think you could use the lid of a tote box, and you will have to pay attention to how stiff or strong it is.
You will have to punch many small holes in it. Shovel some castings on to the perforated plastic top and put it on top of the worm bin so that the worm habitat you want them to go into remains dark (and inviting). Stir up the castings in the plastic top and leave it exposed to day light and the worms should dive.
Good luck with that.
why do my worms migrate to the very bottom mesh covered reservoir bin? i have to fish them out every day. the bins are well hydrated, like a wrung out sponge.
Hi Pam, I am sorry, I don’t have enough information about your bin to hazard a guess about why your worms are diving to the reservoir. My worms are staying lower in the bin now because my garage is wicked hot. When you are observing worm behavior it is always a response to their environment. Guessing at which environmental pressure is influencing them is best done by the person who is observing them. If you are in my county I would be glad to come to where you keep your worms for a consult.
i live in the san diego area.
oh, that would be quite a trip for a consult. I checked your weather, you have beautiful daytime and night time temperatures, so your worms are not too hot. My worms spend a good bit of time below (in the swimming pool) even in the best weather. When I harvest the bin I scoop them and their castings up into the harvest section so that they have to dive again. I am guessing, but I think they go there because they enjoy the moisture. I find earthworms in the filter media of my ponds which is entirely submerged in water. They don’t drown in water as long as it is oxygenated. Thanks for your comment and for reading.
my worm bin always gets tons of white grubs. the compost junk is tad on the wet side, but not overly so. i go in there every other day and pick them out. they are so disgustingly gross and evil looking, and they multiply like rabbits. can the worms and grubs live in harmony or will the grubs overtake my beloved worms?
ps. how do the worms multiply/procreate? are there pregnant worms or do they lay eggs?
i guess i’m on a worm tangent tonight. i’ve ordered red wigglers before, and i killed them somehow in my early days of worm farming (6 months ago). now, i harvest worms from a big wheel barrow that i throw hay, dirt and fruit peels. there are tons of worms in there, and they are red in color. do you think they’re red wigglers? they are from 2-4 inches long.
Pam,
Pam, If the white grubs are pretty big they could be black soldier fly larvae. If you are picking them out it is good to know that chickens and fish love them, so if you have either, you have a nice protein source for them. If you don’t you might put them out for the wild birds. Is your bin the open wheelbarrow then? It is not uncommon to get other composting organisms into an open vibe like that, and even the closed composters get some visitors from the garbage you put in. Some of us freeze our garbage and then thaw it again before feeding it to the worms to make sure there aren’t any fly larvae in the garbage.
If you have fruit flies it might help to cover over your bin with a lot of dry shredded newspaper. My bin has red mites. It doesn’t seem to disturb the worms. I am not sure it is a bad thing if other invertebrates inhabit your worm bin. Remember in the outdoor compost there are lots of creatures eating there. The worms working in the compost don’t seem to have any problem flourishing in that populated environment.
If your worms are red wigglers you will see they have slim red bands on their bodies that gives them their red color.
If the worms you have are doing the work you need them to do in your wheel barrow then I wouldn’t add any other worms to that. There is something to be said for a closed system, that is that you never know what organisms are coming in with a new box of worms, and worms multiply very quickly, and will fill the space they are given in very little time.
Worm mating is a pretty brutal affair. Worms are both male and female at once and during mating they use hooks to manipulate the coupling, competing to be male. It gives new meaning to the term ‘hooking up’. The one that winds up being female makes the egg casings which you can see in your bin. they look like a nearly translucent bronze or orange balls or ovals about the size of a small grape seed.
Here is a url for a worm bin site that may have the answers to your insect or grub questions.
http://www.wormbincomposting.com/wormcompostingbugs.html
well, my worms are FINALLY going and growing like gangbusters. i harvested some red worms from my garden, and they are multiplying like rabbits. what is a good way to harvest the worm castings and then put the worms into another tray? i have a wood framed screen with 1/4 inch mesh; do i dump the worms and everything onto that and sift?
I guess you could try that. I find when I sift my compost it is easy to damage the worms that wind up on the the sifter, so be as gentle as possible. The worms will naturally dive down away from drying air and light so the sifter might be effective if the castings will stay above and you give the worms a chance to dive, like if your mesh is on a frame and is suspended over your wheelbarrow. Good luck with that.
what method do you recommend?
I recommend you give them an opportunity to leave the castings you intend to harvest by pushing the worms and their castings to one side of their tray, and fill the other side with garbage, and cover the garbage over in wet shredded newspaper (straight cut, not cross cut). Stir the side with the castings, and leave it exposed to light (not direct sunlight) in an effort to encourage the worms to move to where there is plenty of food, dampness and darkness.
Or you can put it all on a very fine sifter and wait for the worms to travel down and thru the sifter into a wheel barrow or other container below where there should be shredded wet newspapers or moistened coconut coir waiting for them.
Or buy a proper worm bin.
thanks for the info. i do have a worm bin with the spigot at the bottom; i don’t know that it is the best method for vermiculture.
This is interesting! I want to try this out and would like to know ways on how I can market earthworm composting products. I would really appreciate your reply. By the way, do you know how much one can possibly profit from vermiculture technology? Thanks a lot! – Kristina
Thank you for your comment Kristina. Keep up the good worm farming!
Heya i am for the first time here. I found this board
and I find It truly useful & it helped me out a lot.
I hope to give something back and aid others like you helped me.
Thanks for your comment.
I have a Can O Worms bin and I’m wondering if there are any local suppliers for the coco liner or red wigglers?
Hi Terri, I can supply both. Call me or Lucie if you don’t know how to get ahold of me. Thanks for your inquiry.